Friday, April 28, 2006

Nuts!

A little over a month ago, I assembled my boat trailer, only to find that the kit was missing a crucial part. In fact, without the spindle nut, one of the wheels was held on very precariously by only a cotter pin. I contacted the place where I bought the trailer, and they are still in the process of sending me a replacement part. In the meantime, I searched several hardware stores in the local area, but couldn't find a simple, yet hard-to-find nut. Finally yesterday, I received a package from a different online store: my 3/4", 16-thread castle/slotted/spindle nut arrived, and now both wheels of my trailer are securely fastened, ready for the road.

I hope to finish the sanding of the interior this weekend. Then I can flip the boat over to do the exterior. I anticipate the exterior will go a little faster. Then painting and varnishing can begin!

Wednesday, April 26, 2006

Asymptote

as·ymp·tote n.
A line whose distance to a given curve tends to zero. An asymptote may or may not intersect its associated curve.

As the building of my Passagemaker dinghy nears completion, progress seems to be slowing. That is clearly one figurative definition of asymptote; advancing towards a goal, but never really getting there.

This past weekend, I took a quick trip up to Chicago to visit family. Before that, some household projects required my attention. And on Monday, I spent the evening mowing the lawn, a project that was made more cumbersome by the need to change the oil in my mower, clean and re-thread my string trimmer, and dig the leaf blower out of the corner of the garage where it has sat, unused, all winter. So last night, I was very eager to do some sanding and perhaps get the boat nearer to a stage ready for varnishing. About 45 minutes into the session, my quarter-sheet orbital sander gave out. This led me down the time-consuming path of disassembling it, then reassembling it, only to find that I couldn't discover why the motor would run, but the pad didn't vibrate. So, frustrated and dusty, I cleaned up, had a nice dinner, then searched out my receipt in order to return the sander to Home Depot where I bought it in November. I got there only to find that they don't exchange electric devices after 30 days. To take advantage of Black and Decker's two year warranty, I had to take it to an authorized repair shop. Fortunately, there happened to be one near my workplace. So I took it there this morning, anticipating a lengthy repair process, and wondering what I could do on the boat in the meantime. But much to my surprise, the fine folks at the DeWalt Authorized Service center on Green Springs Hwy in Birmingham were able to exchange my sander for a new one right on the spot. So I am back in business. For those of you keeping score, this is the second sander I have burned up on this boatbuilding project. Let's hope this third one will last long enough to complete it. Total hours: 80.

Monday, April 17, 2006

The varnished truth

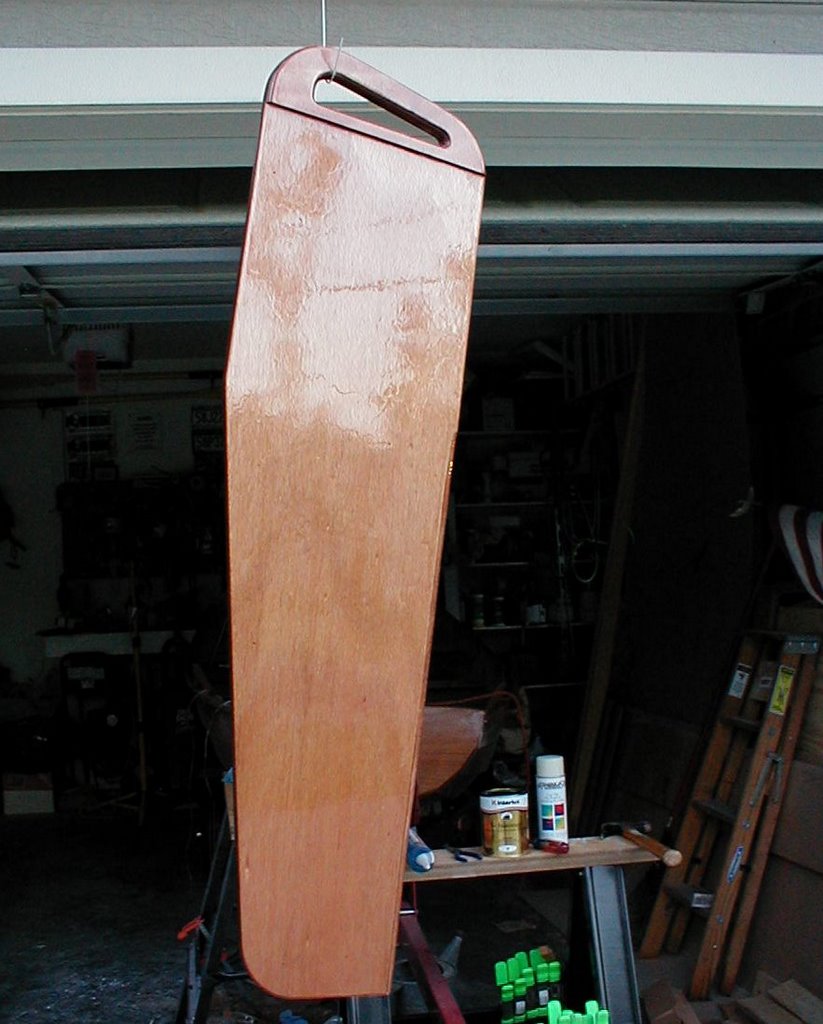
I'm not enough of a biblical scholar to know if Noah ever got tired of sanding the Ark. But I know I am. And I'm guessing my little boat isn't much more than even one cubit long...

But a part of my Easter Sunday was spent in the holiday tradition of boat sanding. The rub rails, daggerboard, rudder head, rudder blade, and mast step all got a good sanding before being coated with a second coat of epoxy. After all that, I even had some time and energy left for some more sanding of the hull interior. Even after an initial going-over with 120-grit paper, there are some rough, orange-peel like sections in the hull interior where the epoxy application wasn't the greatest. Still more work to be done there.

So tonight, I gave that second coat of epoxy on the daggerboard another sanding. I hit it with the 120, then a pass with 220-grit. It looked good enough that curiosity finally overtook me, and I popped the top on a can of Interlux Schooner Varnish. My reading had prepared me for how touchy the application of varnish might be. So I had a small roller for application, and a foam brush standing by for "tipping in", or removing bubbles left by the roller. I was surprised how easily the varnish went on the daggerboard (after I had carefully wiped it free of sanding dust). It didn't even seem necessary to tip in very much. I was careful to apply a thin coat, and all looked good as the daggerboard lay flat. But as soon as I lifted it to do the other side, sags appeared. With subsequent coats, I'll have to be even more careful to put down thinner coats. But overall, I was pleased. It is said one must do a good job sanding, because varnish won't hide any flaws. But I was pleased to find some of the very small sanding swirls and lines did get covered up. Finally, I knew bugs would be a problem with the fresh varnish surface, so I was careful to not turn on my powerful worklights in the open garage as twilight set. But even with no lights, bugs were attracted, and a couple are now stuck in the finish. I'll have to do further coats at a time other than twilight, and most likely with the garage door closed. Fortunately, the garage has a couple of screened windows I can open for ventilation. All in all, a good experiment; one I should be able to improve upon. Total hours 79.25.

Saturday, April 15, 2006

The Marine Police always knock twice

This past week, some other endeavors kept me from boatbuilding. But that isn't to say that no advances towards sailing were made. The Alabama Marine Police assigned the hull serial number, which will allow me to register my Passagemaker dinghy. How they did this was a bit surprising. A while ago, I sent off the form requesting a serial number, as is required in the state for home built boats. I assumed the description of my boat in the form would be enough for them to send me a number. But nowhere in any of my reading was there a mention of a personal visit by an armed Alabama state trooper of the Marine Police division. So when I arrived home from work one day this week, my wife told me the story of being surprised by a knock on the door, and finding a law enforcement officer waiting there. It turned out he merely had to inspect the boat and place a sticker on the transom- and voila!- I now have my serial number. Lucky for me she was home from work that day! The next step is a return to the driver's license office to pay the registration fee, and obtain another number for another sticker to apply, further ruining the appearance of my boat.
Today was a little change from sanding. I finished some odds and ends I have been meaning to get to for a while. Although earlier I had shaped and sanded the daggerboard, I hadn't yet done the rudder blade. I finished that today, rounding the leading edge and sanding the trailing edge to a fine taper. I also routered the mast step plate, and some edges of the tiller head. Then several areas got a first coat of epoxy: rudder parts, daggerboard, rub rails, and some bare edges in the hull, such as daggerboard slot, motor pad and transom knees. Sanding continues tomorrow. Total hours 77.00.

Sunday, April 09, 2006

Sanding continues...

A little bit each night. That's my tactic for dealing with the sanding phase of building a Passagemaker dinghy. Well, not so much a tactic, really, but a consequence of some other things going on right now. So at least I am making progress. The interior has been given a going over with 120-grit paper, but some rough spots remain, a result of some inattentiveness while applying the final overall coats of epoxy. Those drips take a long time to sand down. But at least the bronze screws holding the bottom skeg and skids are nice and bright now! The sanding is indeed tedious, but at least in a couple areas where I started the 220-grit sanding, the result is very satisfactory. There won't be too much more to blog about as the sanding continues. But in the meantime, check out these sanding songs. CLC completed a recent month-long contest to write a "sanding song" and recently announced the winners. Total hours 75.25.

Also, I finally tackled a problem I had been putting off. Earlier, I had installed a trailer hitch on our Saturn VUE. But for months I had been avoiding finishing the job by installing the wiring harness. The main stumbling block was running a dedicated wire from the vehicle's battery to the harness switcher in the rear of the vehicle. One cannot simply splice the trailer wires into the VUE taillight wires because there is insufficient current in that circuit to drive both taillights and trailer lights. Instead, a logic switcher is spliced in, and is connected to its own power supply. I puzzled over several routes to run the power cable from the battery, through the firewall, under plastic panels, and to the compartment in the rear of the vehicle where everything is connected. I finally did it this morning, and after some fumbling with a rubber grommet in the firewall, I got the power wire in place. A clean installation, all ready to splice in the controller and the trailer harness plug.

Tuesday, April 04, 2006

Sanding begins

After tending to some much needed -- and long overdue-- yard work and landscaping for the past couple days, I was able to return to boatbuilding for a short time this evening. Indeed, there seems to be at last some light at the end of the tunnel. Some small building tasks remain, such as assembly of the rudder, and some rigging. But the main task ahead now is finishing the hull. Even here, odds and ends remain. The rub rails and skeg are needing to be epoxy coated, as well as some bare edges of wood, such as the upper daggerboard trunk slot and newly routered edges of the transom knees. But the tedious job of sanding is the one main obstacle between me and sailing. So tonight I began the journey. The belt sander is too brute a force for this job, so the smaller and slower quarter-sheet orbital sander will be the tool that will get the most use. There is plenty of tight spots that will require sanding by hand, also. The entire hull needs going over with 120-grit, and then 220-grit paper. I understand some builders go even finer before applying the paint or varnish. But I already understand I have accumulated too many small building flaws to ever achieve a contest-winning, show boat appearance. I am more realistically hoping to arrive at a respectable looking boat that will be durable, a true sailer, and decent looking. The journey begins... Total hours 73.75.

Sunday, April 02, 2006

Design lineage, part II

Earlier, I mentioned a book by Frank Rosenow, and the obvious design influences derived from the Swedish eka working boat. There is a further bit of design heritage in the Passagemaker dinghy that should be mentioned. The famed small boat designer Sir Jack Holt also had his role influencing the design of the Passagemaker with his Mirror racing dinghy. This role is acknowledged by the Passagemaker designer himself, John C. Harris, who says, "Both the Mirror and the Passagemaker are prams with gunter-sloop rigs, which is sort of my wink-and-nod to Holt." Indeed, the economical gunter rig is found in both boats, combining a fast, weatherly Marconi-style rig with the convenient short and transportable spars of a gaff rig. But beyond that, the serious racing purpose of the Mirror is apparent: the design sports a finer bow, a planing hull, and the more complex and versatile running rigging of a class racer. Many mirrors are also equipped with hiking straps and trapeze wires for hard sailing, in contrast to the simpler, all-purpose configuration of the Passagemaker. Large numbers of Mirrors exist today, and Mirror clubs are active in England. There, the fine art of dinghy sailing is refined, and subtle points of rig tuning discussed. Passagemaker builders have Jack Holt's Mirror dinghy to thank as another design influence.

Saturday, April 01, 2006

Risers, knees and pads

Several little things got done today. The biggest job was to finish the rub rails: The ends were trimmed and shaped, and then the two layers of the rail were sanded down into one smooth rail. At that point, the edges on top and underneath were shaped with the router and 1/4" roundover bit. After that, the fitting of a few last items could be done. The oarlock risers, little tapered blocks of wood to which the bronze oarlock sockets will be mounted, were epoxied to the rubrails with cabo-sil thickened epoxy. There are two rowing stations on the Passagemaker dinghy, and so the two pairs of risers are mounted 14" aft of the midships bulkhead, and 12" aft of the forward bulkhead. The motor pad's edges were rounded off with the router and it was then mounted on the stern transom. Finally, the bow and stern transom knees were "tack-welded" in place. The bow knee required some work, as the angle between the bow seat and transom was slightly smaller than what the knee was cut for. A little sanding and router edging prepared the knees for tack welding, which is to say, cabo-sil epoxy on the edge surface of the knees to hold them in place. They were made plumb and square, and taped to hold them in place while the epoxy cured. Once cured, a peanut-butter epoxy fillet will be applied around each one. Total hours 72.75.