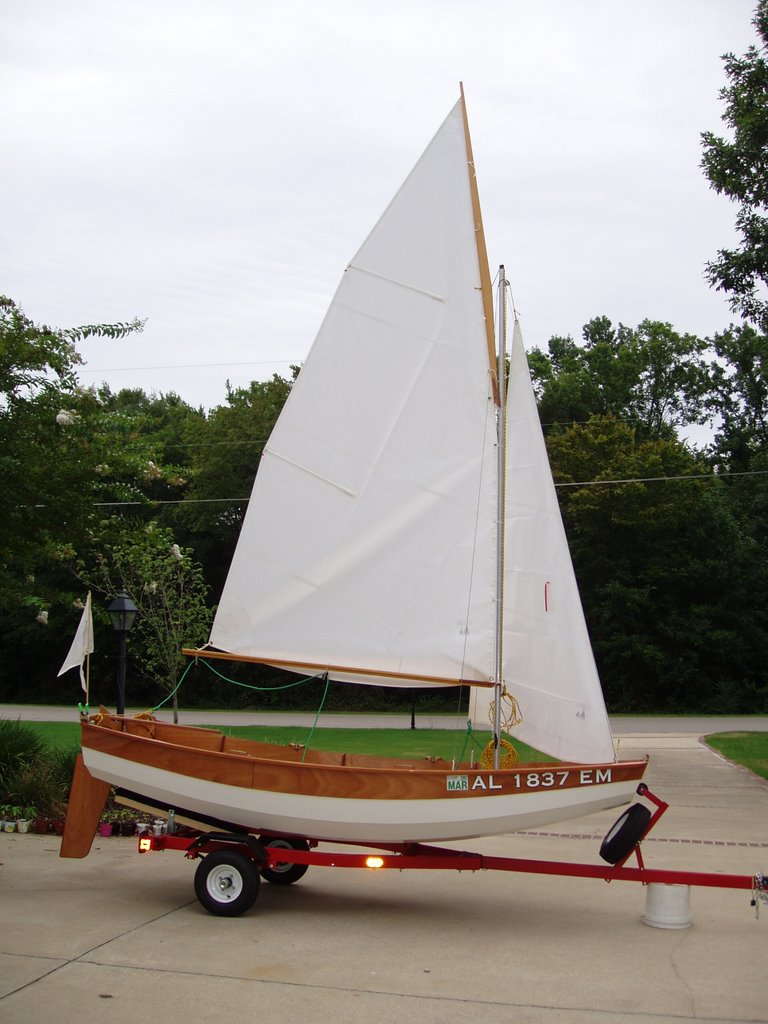
Sunday, July 30, 2006

Sail away

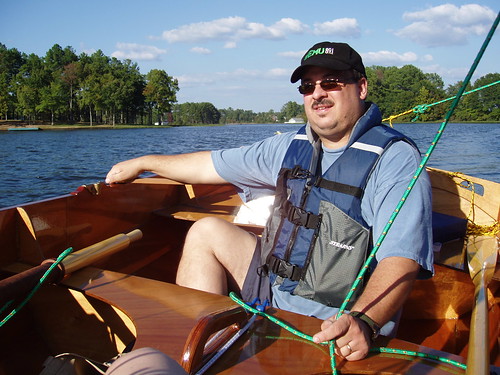
Fuggles hit the water with sails for the first time today. Such was the excitement that I took not a single photo. But believe me, we got a nice afternoon of sailing in. After arriving at the boat ramp, I rigged the mast and sails, and then we launched at the ramp. I hoisted the main, and it was relatively easy this time to run it completely up with no binding, and with the gunter yard right on the mast. We sailed away slowly at first, but little puffs of wind came, giving us momentum, and then dying. Finally, after about half an hour, we got a fairly steady light breeze, which allowed us to practice our tacks. We beat to windward up the length of the lake just in time for the wind to die again. About that time, we heard some distant thunder, even though the sky above us was quite clear. But we decided to turn around and head for the boat ramp. As we ran down wind, the thunder built, and it became time to break out the oars. I rowed from the forward seat, hunkered down slightly to clear the main boom. We managed to get back to the dock just as the first dark clouds appeared. By the time I got the car and trailer, waited my turn at the ramp, and loaded up Fuggles, things were really looking ominous, although a fresh breeze was kicking up. We got on the road for home and were treated to some rain and a spectacular lightning show just to our south. A good introduction to Passagemaker dinghy sailing; I look forward to many more outings.

Bottom Line

Just to satisfy my curiosity, I kept a tally of the costs involved in the construction of a standard version Passagemaker Dinghy with sails. Readers of this site are no doubt familiar with the maxim about sailing and throwing money into a hole in the water. I am pleased to report that since my boat was rather small, the hole wasn't too big. Altogether, it cost me $3439.81 to bring a Passagemaker dinghy to sailing readiness.

Now, that figure may be a bit misleading. It, of course, includes the cost of the boat kit and sails themselves. But it also includes many power tools, safety gear and basic items such as saw horses. I began the project with none of these, and as far as I will use these on future projects, it isn't entirely fair to include their costs here. To further add to the inaccuracy of the figure, there are some small costs that I haven't included, such as fees and charges to obtain licensing and registration for a boat in this state. There are also one or two recent supply shopping forays that I haven't yet included, as I continue to search for the receipts. But I'm confident that the figure is within 5% accuracy.

Curious about the details? Check out this Excel spreadsheet and judge for yourself.

Saturday, July 29, 2006

Rain, rain, go away

It is a cruel irony that all summer, while I finished building Fuggles, central Alabama has been going through a significant drought. But today, when she is ready to sail, line after line of thunderstorms have been passing through the area. So instead of sailing, we went to the new Woody Allen movie, "Scoop". Not one of Woody's best, but it was entertaining. Meanwhile, the forecast has recently changed, and calls for more rain tomorrow.

Meanwhile, I have been getting back to entries in my costs log. I started the project keeping a spreadsheet of all costs involved in building Fuggles. Somewhere along the line I slacked off on keeping up with purchases in real time. I'll start entering things again from my stack of receipts, and at some point offer an insight into what the boat ended up costing me. Whatever the bottom line, it will be well worth it, as I am very satisfied in how my first boat building project turned out.

Just add water

Fuggles is now fully rigged and ready for sailing. I lashed the mainsail on the yards, and attached the sheets and halyards this morning. I am not totally satisfied with the parrel at the gunter yard jaws. This is a loop of line intended to keep the fork of the upper yard riding against the mast. However, I have a hard time keeping it from binding up and preventing the main sail mast from being hauled completely up. Part of the problem is packing tape residue on the mast, which I need to clean off better. Part is a mainsail halyard that is too stretchy; I'll have to hunt for some better line to use. And part is the mast stopper and the eye that the halyard runs through. I think the halyard is catching on the sharp edge of the aluminum tube that serves as the mast. If I file down this sharp cut edge and round it over, I think it won't chafe the halyard as much.

All that remains is a good day for sailing. Weather forecast today calls for good chance of thunderstorms. It looks like we'll wait until at least tomorrow for the inaugural sail.

Thursday, July 27, 2006

Rudder

After some wet sanding, the daggerboard, rudder, and spars got their final coat of varnish this morning. And then this evening, I installed the rudder hardware. The pintels went on the rudder head with a little effort and persuasion with a c-clamp to get the side straps tight and flat. I then marked the centerline of the stern transom and marked the rough position of the gudgeons. I drilled holes and installed the top one, then hung the rudder head to check the alignment. Then I marked, drilled and installed the lower gudgeon. Everything looks fairly close to being aligned. The stainless steel screws in the lower gudgeon go all the way through the transom (as opposed to the upper gudgeon screws, which have the double thickness and motor pad to go through). It shouldn't be too much of a problem that the lower screws penetrate the transom. Their position is rarely submersed, and a generous layer of silicone caulk was applied during installation. So I don't think there will be any leaking concerns. However, I may seal off the inside surface where the screws penetrate with caulk or a coating of epoxy, just to be safe.

So that's pretty much it. I have to lash the main sail to the boom and gunter yard, rig the main and jib sheets and halyards, and we are ready to sail. Weather forecasts for this Saturday look marginal, with scattered afternoon thunderstorms. Hopefully we can get the first sailing cruise of Fuggles in then.

So, it looks like the estimate of 100 hours to build a sailing version Passagemaker was remarkably accurate. At least for this builder. Total Hours 99.50.

Tuesday, July 25, 2006

Fuggles gets her wings

Tonight, I got a chance to start configuring the sailing rig for Fuggles. I started by running a string down the centerline of the boat and positioned the mast step. Once the correct position for the step was marked, I drilled holes to mount it on the forward seat. It will be supported by the mast step support that was epoxied in place before the bow seat was installed. I then stepped the mast, and held it in approximate position while I fabricated the backstay slips. Instead of turnbuckles, I created lashings out of strong nylon cord. About a dozen turns connected the thimble eye to the brass spring clip. The lashing is simple and strong, but I will have difficulty adjusting the tension of the backstays should that be needed later on. We'll have to see if turnbuckles are needed later on. But for now, this should get us on the water with the sails. I ran up the gunter yard, just to take a look at things. All that remains is to install the rudder hardware, and to lash the main sail to the boom and gunter yard.

Odds 'n Ends

Little spurts of activity have been going on since the launch. I have been chipping away at the many little tasks that need to be completed for the fitting out and sail launch. The eye straps for the backstays were mounted, and I played around with the lashing of the bronze spring clip on the forestay. What I improvised looks like it will be pretty sturdy. I also made a pass through the hardware store and stocked up on a couple kinds of line for the rigging. I found that getting 1/4" main halyard line through a 1/4" hole in the gunter yard was difficult until I fashioned a thread fish line to pull it through, rather than trying to push it through. I also picked up some stainless steel panhead wood screws to mount the rudder gudgeons. These replace the screws that I mislaid somewhere during the project and move to a new house. I will wait another day or so to mount the rudder; I'd like to get one more coat of varnish on the rudder head and blade before mounting the hardware.

And also, with a bit of regret, I finally applied the registration number and yearly renewal sticker to the bow on either side of Fuggles. It's not quite as bad, aesthetically, as I had feared. And what's more, it will be required if we are to sail her- as soon as this weekend. NWS forecast is calling for 6-12 mph winds, which would be ideal for the first sailing shakedown. Perhaps a Friday afternoon rigging, and a Saturday sail. Stay tuned! Total Hours 97.75.

Wednesday, July 19, 2006

Showtime!


Announcing the latest Intron Films release: The Building of Fuggles. This is a short documentary of the construction process of a Passagemaker Dinghy. Hope to soon have a "Directors cut" with additional material after the sailing shakedown cruise in a week or so.

Windows media viewer file, 14.7 MB. Duration 4:35 minutes.

Sunday, July 16, 2006

What's in a name?


For the name of our Passagemaker dinghy, Kathy and I agreed on Fuggles. The name has significance for us on several levels. Fuggles is the name of a variety of hops that are used to flavor several types of traditional English ales, including the ale style called India Pale Ale, or IPA. This is special, since it ties in one of my other hobbies- homebrewing. Kathy started me on the hobby during our first Christmas together, and since then, I have won a few awards with my brews, and had lots of fun along the way. Fuggles was christened with a splash, not of traditional Champaign, but of an IPA from Portland, Maine. Although Fuggles was built in Alabama from a kit made by a Maryland company from wood grown in Africa, the spiritual home of all wooden boats must be Maine. The state is home to many shipyards that craft fine sailing and motor vessels of wood using traditional techniques. Also, the famed Wooden Boat School is located in Maine, and is instrumental in preserving the skills needed in the building and maintaining of beautiful wooden boats of every type.

It is immensely satisfying to sail in a boat one builds himself. May Fuggles sail safely for many years to come.

Delivery

Kathy and Peter are pleased to announce the arrival of Fuggles, at 2:52 p.m. on July 16, 2006. Fuggles weighed in at approximately 95 lbs, and measured 11 feet, 6 inches long. The christening included appropriate words from Peter, and an inaugural splash of Shipyard IPA. After a difficult 9 months gestation, Fuggles took to the water eagerly, and swam well. The proud parents look forward to the development of sails in the very near future.

Relaxing

After a long week at work, nothing beats getting out on the new boat.

Rowing

Launch

Rumors

Yesterday afternoon in the mid-summer Alabama heat, the fifth and final coat of varnish went on the topsides of the Passagemaker. The result was a satisfying deep gloss that complimented the white of the hull bottom. This morning the oarlock sockets were installed, with care to embed the screws in silicone caulk. Even though the boat is not yet fully fitted out for sailing, she could be rowed. Could a christening, launch, and rowing trial take place later today? Stay tuned... Total Hours 97.00.

Saturday, July 15, 2006

Almost there

As the early morning temps leapt into the upper 80s with humidity levels to match, I rolled my Passagemaker dinghy out for one last wet sanding session. This was just a light going-over with 320-grit paper before the fifth and final coat of varnish. Since my sequence is a little out of whack, the ancillary parts like the daggerboard, rudder, mast step and spars only have a couple coats of varnish. I'll have to catch them up over the next week. I hope to get the final coat of varnish on later today, which will then leave one more coat of the white bottom paint for next week. It's almost hard to believe the project is almost done. It's looking more and more likely that CLC's estimate of 100 hours to complete the sailing version of this standard Passagemaker is pretty darn close. At least for this builder. Total Hours 96.25.

Thursday, July 13, 2006

Fab four

Another day, another coat of varnish. This morning was coat four. By now I have finally learned some basic lessons. Like not coating the rub rails before I have to lean in and do the bottom panels; less varnish gets on my shirt that way! This weekend should see the last coat on the interior, for now. Then next week, a final coat of white paint on the outer hull, some additional varnish coats on spars and fins, and installation of the hardware and rigging. Launch is officially projected to be August 4, which is also Coast Guard Day! Total Hours 95.50.

Tuesday, July 11, 2006

Thank you sir, may I have another?

As with other stages of this boat building project, I quickly have fallen into a comfortable routine with the application of the topside varnish. After the coat on Sunday, the boat was allowed to dry for about 24 hours. Then last night I gave it a good sanding. This was my first attempt at wet sanding, using some 320-grit paper (made in Finland- not the horrible cheap stuff from India I have been using) and keeping a wet surface, I was really surprised how well things looked after the quick sanding session. Then this morning before work, I applied the third coat of Interlux Schooner varnish. A nice gloss is starting to develop, as well as a little depth in the varnish layer. Tomorrow evening, the cycle starts again for coat 4.

I also received my registration stickers from the Decal Zone. Very quick service, and the vinyl registration numbers look great. Total Hours 94.00.

Sunday, July 09, 2006

Layer upon layer

When I could no longer resist the temptation, I went out and put a second coat of varnish on the boat. My concern was attracting bugs by using lights in the evening. But daylight lasts long enough now that it was still pretty bright outside, and so far, bugs haven't been a problem. The second coat seems to have covered the sanded, crazed spots pretty well. Time will tell if I avoided the same mistake with this second coat. It was a little harder to tell this time where varnish had already been applied, and where my wet edge was. But I am pretty sure everything got a second coat. My neighbors must have thought it strange to see me dancing around so much, craning my neck to catch a reflection of light at an angle to reveal a sloppy brush stroke here or a dry spot there. But with the planned second coat done a little ahead of schedule, I should be able to sand tomorrow evening, and be ready for the third coat Tuesday morning. Total Hours 92.50.

Yard, Sail

Prep work was the order of the day today, as I turned my attention to the spars. A number of holes had to be marked and drilled in the gunter yard and the main boom, so that I could begin varnishing these parts. The instructions mention that it is surprisingly difficult to epoxy coat these pieces, and that multiple coats of varnish are sufficient to protect them. But before I could do this, a number of holes had to be drilled. In the gunter yard, there are holes positioned all along the spar that correspond to grommets in the luff of the main sail. These are the points where the sail will be lashed to the gunter. Also, a hole is drilled in the long axis of the gunter at its center for the attachment of the main sail halyard. Along the main boom, holes must be drilled for mounting of two mainsheet blocks, the main clew outhaul, and the boom downhaul. When these were marked, I drilled each with a 1/4" bit. I also mounted the main mast stays and jib halyard block to the masthead. Finally, three cleats were installed at the base of the main mast which will be used to belay halyards and the main sail downhaul.

After that, I rolled the boat out into the fresh afternoon breeze and gave the first coat of varnish a light sanding. I was disappointed to find several areas of crazing. This apparently resulted from a too thick coat of varnish. Since they were mostly on horizontal surfaces, there weren't drips or runs, but as the overly-thick layer dried, it crinkled up into a pattern much like a fingerprint. So extra sanding mostly removed these areas, and served as a reminder to be extra careful about applying a thin layer when I put the second coat on tomorrow morning. Total Hours 91.75.

Saturday, July 08, 2006

Sightings

Recently, I posted a link to the review of the Passagemaker dinghy by noted marine architect Robert H. Perry, which was published in Sailing Magazine. To confuse matters, now the July issue of Sail Magazine (no "ing") has a short article on a selection of hard dinghy tenders. Read the article here. The article deals primarily with manufactured plastic models, and only mentions the Passagemaker as an aside. It is good to see, however, that the Passagemaker compares very well with the more modern boats in terms of size, weight, capacity, and price. And none of the plastic fantastic tenders have the character and class of a hand-built wooden dinghy!

Shine on!

In the calm, cool morning air, my Passagemaker Dinghy got her long-awaited first coat of varnish. For the bright finish, I am using Interlux Schooner varnish. This product will give a high gloss, while also giving UV protection to the underlying epoxy. On the whole, I was pleased with how the first attempt went. I was able to experiment with the application characteristics of the varnish on the daggerboard, which got a first coat some time ago. There certainly is a lot of surface area on the inside of this boat! I used a roller to cover some of the larger, flat expanses. But a foam brush was still needed for tipping in, and also for the many tight spots and corners. Keeping the coat as thin as possible, I think I managed to avoid many drips and sags. The entire interior and exterior transoms and sheer strake took just about one-half quart to coat. I have three quarts on hand, which will give me enough for the recommended 5-6 coats that are needed for a durable finish. Even after this first, I am encouraged with how things look. And now, I'm more eager than ever to get out on the water! Total Hours 90.50.

Friday, July 07, 2006

Papers, please

This morning, I surmounted another hurdle before being able to sail. Some time ago, I obtained a hull serial number, as required for a home made boat under Alabama law. So today, I finally got around to once again visiting my favorite place, the county license office, and purchased the necessary boat registration. This number, different from the hull serial number, is more like a car's license plate. Only this number and yearly renewal sticker must be prominently displayed on both sides of the Passagemaker dinghy's bow. I thought I might be able to avoid marring the appearance of my boat by claiming it was primarily a non-mechanical powered boat under 16 feet in length, but there is specific language in the law concerning the registration of sailboats of any size. And since that is the way I will primarily use my Passagemaker, I figured I shouldn't try to cut corners. So an hour and $12 later, I have a registration number and some large yearly stickers. If I must ruin the look of my boat, I thought it best to minimize the damage. So instead of address number stickers from the hardware store, I have found a company that will print boat registration numbers in a one piece sticker and in a variety of colors and fonts. My order goes off today!

Thursday, July 06, 2006

Second paint coat


The exterior hull went through another sanding and painting cycle last evening and early this morning. Last evening, I moved it out and sanded it lightly after the first coat of Interlux Brightside white. There was one drip, a few specks of dust or larger debris, and a couple of hairs (from me or the resident cat, I can't be sure). I started sanding with 220-grit paper on my orbital sander, but found this left an undesirable brownish tinge to the paint that was the same color as the grit in the paper. For whatever reason, the same paper left no mark if I sanded by hand using a sanding block. So this is what I did in the humid evening air. After that workout, I wiped down the dust from the hull and moved it back into the shop, then masked the edges again with tape and newspaper as previously. I didn't paint in the evening, since the garage door needs to be open for ventilation, but the lights would attract too many bugs in the evening twilight. So early this morning, the hull got its second coat of paint. The sharpness of the shine seemed to improve noticeably after the second coat.

Before applying the third coat of paint using the method above, I may do some varnishing of the interior. The main reason is that my assistant for moving the boat will be unavailable for the next week. But if I flip the hull over, I can put it on the trailer and move it out for sanding and in for varnishing single handedly. Total Hours 89.25.

Tuesday, July 04, 2006

Hull paint


After an unsatisfying sanding session yesterday, things began to look up this morning. I masked off the hull again, and then applyed the first coat of paint. For my "standard" Passagemaker Dinghy paint scheme, I chose Interlux Brightside White (5349), a one-part polyurethane high-gloss paint. Using the roll-and-tip technique in which a thin layer of paint was applied with a foam roller, and then bubbles left by the roller were removed with quick, delicate swipe with a foam brush, things went fairly quickly. I was happy with the result- no sags that I can detect yet, and only a couple of small pieces of debris, i.e. a hair or two, or dust flecks. Not yet a mirror finish, but one I was proud of. It took about half of a quart for the hull bottom, and the manufacturer calls for at least two coats. I have enough paint supply for four coats, if I have that much patience. The one difficulty is a few tight spots, like the one between the #1 panel-bottom panel lapstrake joint and the bow end of the skids. This is a narrow spot where my roller wouldn't fit. I have a handle for a smaller, 2" roller, but I need to get some refills for it today. Total Hours 88.00.

Monday, July 03, 2006

Primers Sanding

An afternoon thunderstorm brought a bit of much needed rain to central Alabama, while also cooling the temperature from the upper 90s to the mid 70s. It was these conditions that I had for the sanding of the primer coat on the exterior hull. I was only a few minutes into the process of sanding with 120-grit paper when I found the conditions were less than ideal. The high humidity caused the primer to clog the paper fairly quickly. This is due to the titanium dioxide in the primer, which absorbs the moisture from the air and becomes gummy. The optimal technique is to prime and get the first paint coat on the boat in dry weather. Unfortunately, low-humidity days are few and far between in the deep South this time of year, even during a drought. So I pressed on, hoping for the best. The surface is fairly smooth, and was then wiped down and cleaned. All is ready for the first coat of true paint. Total hours 87.00.

Sunday, July 02, 2006

Pre-Kote


Bright and early this morning, I began the process of painting the exterior hull. There are any number of schemes for painting a small sailing pram; the variety is only limited by the imagination of the builder. However, I opted for a scheme that is best called the "standard" finish. By this, I mean a finish where the exterior bottom of the hull is painted white, leaving the exterior top strake and all of the interior finished "bright", or varnished. This is the scheme used by CLC for their showroom model Passagemakers, and I think it is a simple, elegant decor. But even within this basic finish, there are small variations. Gloss or satin varnish? Where to finish the paint edge on the transoms- leave the strake edge bare, or paint over it? Painted or bright skeg? The minute details can be endless. I chose to adhere to the K.I.S.S. principle, and to keep things as simple as possible.

Accordingly, I masked the top strake and the transom (I like the look of a little plywood edge, so I'll keep the strake ends visible) with 3M blue masking tape, medium adherence. Then I gave the hull a first coat with Interlux Pre-Kote primer. This is a high-build primer, designed to flow well, yet fill small imperfections in the surface. I found that about half of the 1-quart container was enough for one coat on the hull. I am still debating whether to add a second coat. Already, the hull looks nice. The scarfs in the strakes are well hidden, and even the one or two stitch holes I hadn't completely filled are pretty well hidden. The primer went on most of hull with a small foam roller, but I had to resort to a small trim brush to get to some small corners around the skids, and in the skeg handle. Total Hours 86.25.

Saturday, July 01, 2006

Washdown


Finally, the day came to get the boat ready for painting. This involved its first trailer trip, to a new house we have recently purchased. It is only a short distance from the old one, where all the boat assembly had been done. But it seemed like a good time to bring it to a new shop, which is nice and clean, and free of sanding dust. So the dingy was transported on its trailer, and washed down in the driveway of our new home. A quick spongebath was needed to removed sanding dust and other surface contaminants prior to painting. After a thorough wash and rinse inside and out, she was moved to the new shop (garage) and allowed to dry. Masking and priming on the bottom hull are next!