Friday, August 04, 2006

Bon voyage

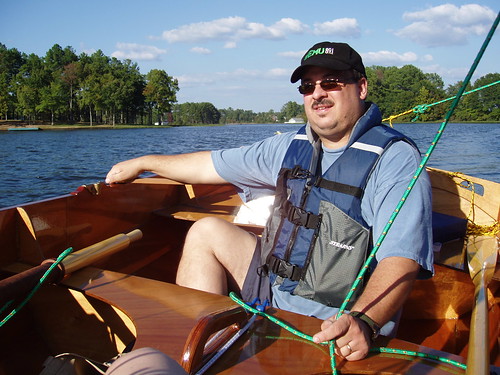
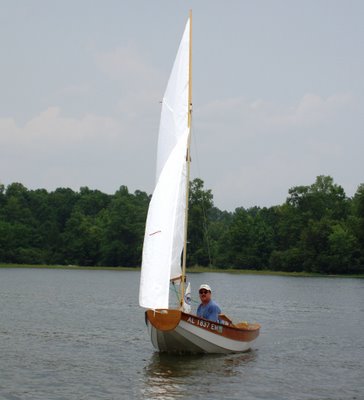
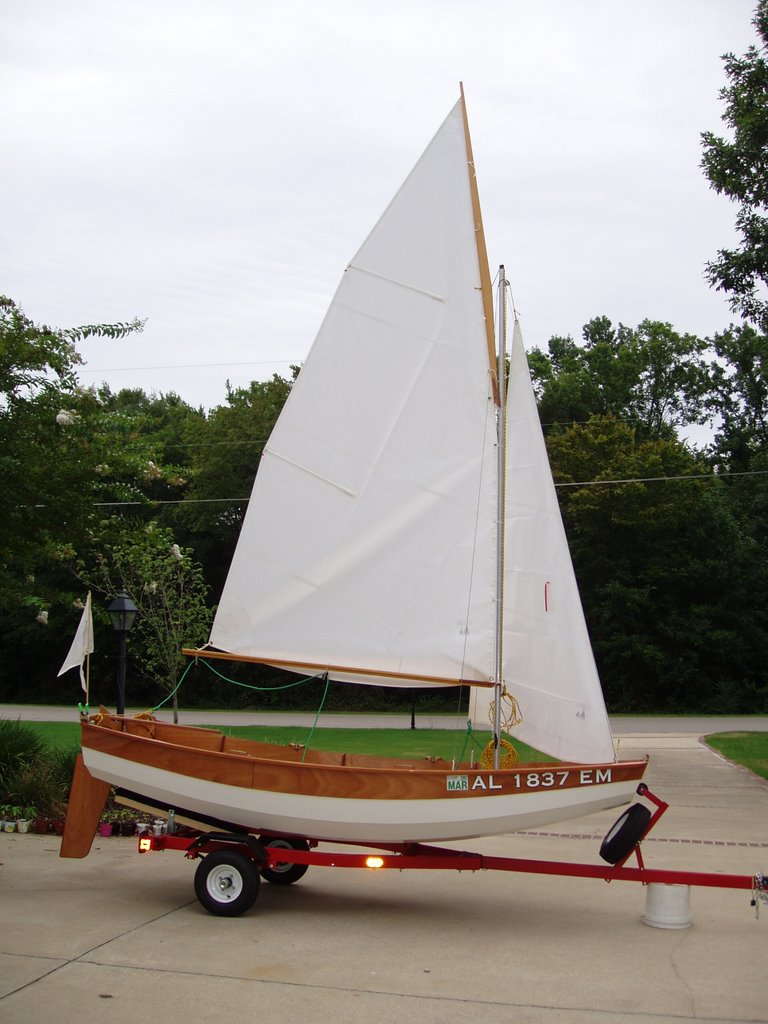
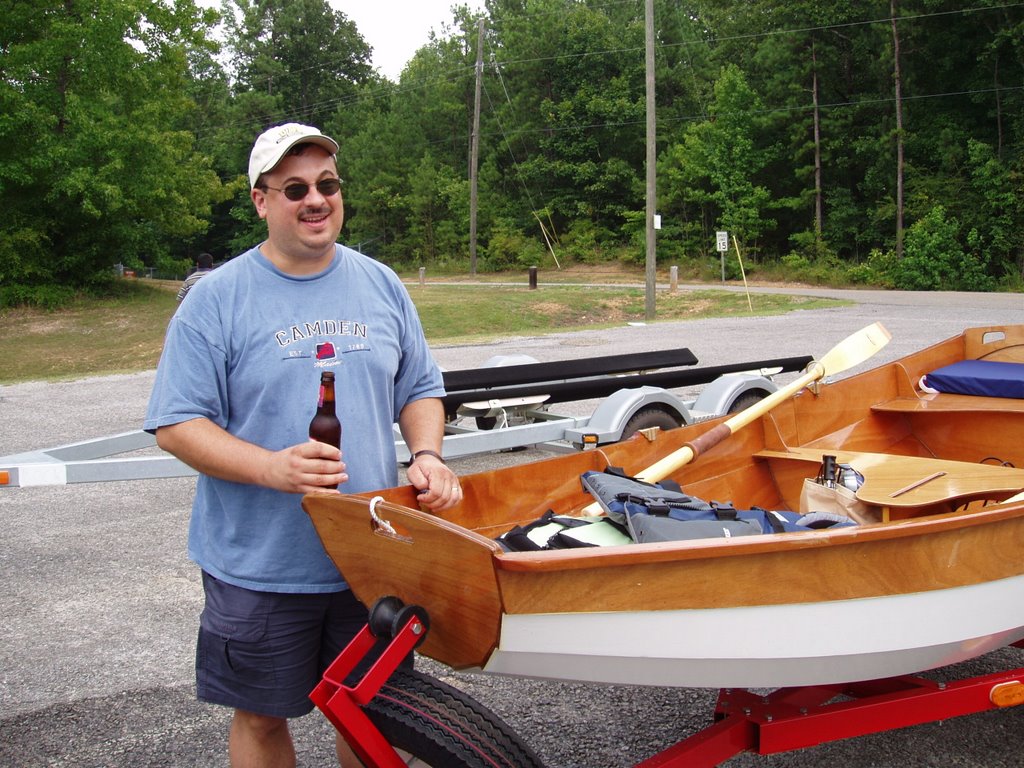
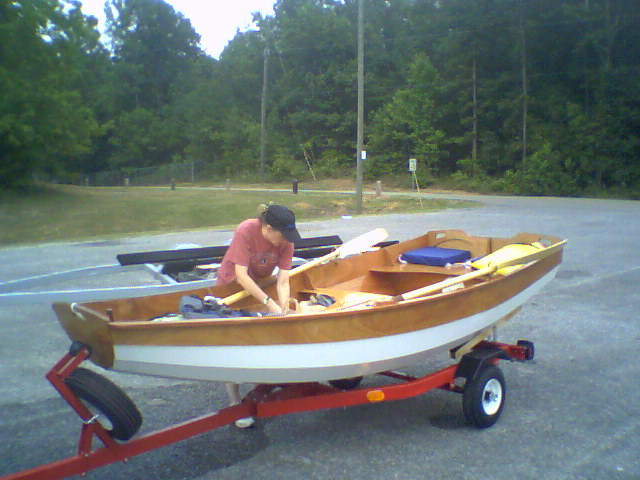
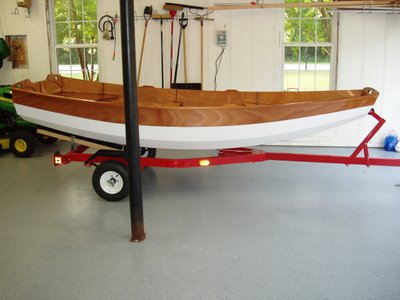
With the first official sail last weekend of Fuggles, the purpose of this blog officially comes to a close. About nine months ago, I stumbled on a web site for a small company called Chesapeake Light Craft and was instantly intrigued by the collection of small wooden boat kits they had to offer. It wasn't long before a collection of parts arrived in a shipment at my door. This blog has detailed the conversion of the oddly shaped pieces of plywood into a beautiful wooden sail boat. It has been a wonderful experience for me. Since I started out with virtually no woodworking skills, it is a pleasant surprise to end up with a product that I can be so proud of; a true testament to the Passagemaker's designers and all the people at CLC. You can view a short slide show of the building and launch of my boat here.

Where to go from here? I had considered maintaining this blog as an online log of various cruises of Fuggles. But I think those will be better placed over in the Passagemaker dinghy forum. Why not go over and join the small but growing group of Passagemaker enthusiasts? Even in the week since my first sail, two more builders have described the completion of their building projects, and a third has just ordered his kit. With the family of Passagemaker builder/owners growing all the time, it won't be long before it becomes a sailing class, with Passagemakers competing against each other in regattas. Who knows what the future will bring for this boat design?

Finally, I'd like to thank all those who kept tabs on my building project, and offered words of advice or encouragement along the way. It was a project I entered in to with some trepidation, but am very proud to have finished. The completion of building is, of course, the beginning of sailing. I look forward to reaching the milestone of 100 hours of sailing, to equal the 100 hours of building. And then I look forward to many more sailing hours. As with most blogs, this one runs in reverse chronological order, with the most recent posts first. The journey begins here.

Sunday, July 30, 2006

Sail away

Fuggles hit the water with sails for the first time today. Such was the excitement that I took not a single photo. But believe me, we got a nice afternoon of sailing in. After arriving at the boat ramp, I rigged the mast and sails, and then we launched at the ramp. I hoisted the main, and it was relatively easy this time to run it completely up with no binding, and with the gunter yard right on the mast. We sailed away slowly at first, but little puffs of wind came, giving us momentum, and then dying. Finally, after about half an hour, we got a fairly steady light breeze, which allowed us to practice our tacks. We beat to windward up the length of the lake just in time for the wind to die again. About that time, we heard some distant thunder, even though the sky above us was quite clear. But we decided to turn around and head for the boat ramp. As we ran down wind, the thunder built, and it became time to break out the oars. I rowed from the forward seat, hunkered down slightly to clear the main boom. We managed to get back to the dock just as the first dark clouds appeared. By the time I got the car and trailer, waited my turn at the ramp, and loaded up Fuggles, things were really looking ominous, although a fresh breeze was kicking up. We got on the road for home and were treated to some rain and a spectacular lightning show just to our south. A good introduction to Passagemaker dinghy sailing; I look forward to many more outings.

Bottom Line

Just to satisfy my curiosity, I kept a tally of the costs involved in the construction of a standard version Passagemaker Dinghy with sails. Readers of this site are no doubt familiar with the maxim about sailing and throwing money into a hole in the water. I am pleased to report that since my boat was rather small, the hole wasn't too big. Altogether, it cost me $3439.81 to bring a Passagemaker dinghy to sailing readiness.

Now, that figure may be a bit misleading. It, of course, includes the cost of the boat kit and sails themselves. But it also includes many power tools, safety gear and basic items such as saw horses. I began the project with none of these, and as far as I will use these on future projects, it isn't entirely fair to include their costs here. To further add to the inaccuracy of the figure, there are some small costs that I haven't included, such as fees and charges to obtain licensing and registration for a boat in this state. There are also one or two recent supply shopping forays that I haven't yet included, as I continue to search for the receipts. But I'm confident that the figure is within 5% accuracy.

Curious about the details? Check out this Excel spreadsheet and judge for yourself.

Saturday, July 29, 2006

Rain, rain, go away

It is a cruel irony that all summer, while I finished building Fuggles, central Alabama has been going through a significant drought. But today, when she is ready to sail, line after line of thunderstorms have been passing through the area. So instead of sailing, we went to the new Woody Allen movie, "Scoop". Not one of Woody's best, but it was entertaining. Meanwhile, the forecast has recently changed, and calls for more rain tomorrow.

Meanwhile, I have been getting back to entries in my costs log. I started the project keeping a spreadsheet of all costs involved in building Fuggles. Somewhere along the line I slacked off on keeping up with purchases in real time. I'll start entering things again from my stack of receipts, and at some point offer an insight into what the boat ended up costing me. Whatever the bottom line, it will be well worth it, as I am very satisfied in how my first boat building project turned out.

Just add water

Fuggles is now fully rigged and ready for sailing. I lashed the mainsail on the yards, and attached the sheets and halyards this morning. I am not totally satisfied with the parrel at the gunter yard jaws. This is a loop of line intended to keep the fork of the upper yard riding against the mast. However, I have a hard time keeping it from binding up and preventing the main sail mast from being hauled completely up. Part of the problem is packing tape residue on the mast, which I need to clean off better. Part is a mainsail halyard that is too stretchy; I'll have to hunt for some better line to use. And part is the mast stopper and the eye that the halyard runs through. I think the halyard is catching on the sharp edge of the aluminum tube that serves as the mast. If I file down this sharp cut edge and round it over, I think it won't chafe the halyard as much.

All that remains is a good day for sailing. Weather forecast today calls for good chance of thunderstorms. It looks like we'll wait until at least tomorrow for the inaugural sail.

Thursday, July 27, 2006

Rudder

After some wet sanding, the daggerboard, rudder, and spars got their final coat of varnish this morning. And then this evening, I installed the rudder hardware. The pintels went on the rudder head with a little effort and persuasion with a c-clamp to get the side straps tight and flat. I then marked the centerline of the stern transom and marked the rough position of the gudgeons. I drilled holes and installed the top one, then hung the rudder head to check the alignment. Then I marked, drilled and installed the lower gudgeon. Everything looks fairly close to being aligned. The stainless steel screws in the lower gudgeon go all the way through the transom (as opposed to the upper gudgeon screws, which have the double thickness and motor pad to go through). It shouldn't be too much of a problem that the lower screws penetrate the transom. Their position is rarely submersed, and a generous layer of silicone caulk was applied during installation. So I don't think there will be any leaking concerns. However, I may seal off the inside surface where the screws penetrate with caulk or a coating of epoxy, just to be safe.

So that's pretty much it. I have to lash the main sail to the boom and gunter yard, rig the main and jib sheets and halyards, and we are ready to sail. Weather forecasts for this Saturday look marginal, with scattered afternoon thunderstorms. Hopefully we can get the first sailing cruise of Fuggles in then.

So, it looks like the estimate of 100 hours to build a sailing version Passagemaker was remarkably accurate. At least for this builder. Total Hours 99.50.

Tuesday, July 25, 2006

Fuggles gets her wings

Tonight, I got a chance to start configuring the sailing rig for Fuggles. I started by running a string down the centerline of the boat and positioned the mast step. Once the correct position for the step was marked, I drilled holes to mount it on the forward seat. It will be supported by the mast step support that was epoxied in place before the bow seat was installed. I then stepped the mast, and held it in approximate position while I fabricated the backstay slips. Instead of turnbuckles, I created lashings out of strong nylon cord. About a dozen turns connected the thimble eye to the brass spring clip. The lashing is simple and strong, but I will have difficulty adjusting the tension of the backstays should that be needed later on. We'll have to see if turnbuckles are needed later on. But for now, this should get us on the water with the sails. I ran up the gunter yard, just to take a look at things. All that remains is to install the rudder hardware, and to lash the main sail to the boom and gunter yard.

Odds 'n Ends

Little spurts of activity have been going on since the launch. I have been chipping away at the many little tasks that need to be completed for the fitting out and sail launch. The eye straps for the backstays were mounted, and I played around with the lashing of the bronze spring clip on the forestay. What I improvised looks like it will be pretty sturdy. I also made a pass through the hardware store and stocked up on a couple kinds of line for the rigging. I found that getting 1/4" main halyard line through a 1/4" hole in the gunter yard was difficult until I fashioned a thread fish line to pull it through, rather than trying to push it through. I also picked up some stainless steel panhead wood screws to mount the rudder gudgeons. These replace the screws that I mislaid somewhere during the project and move to a new house. I will wait another day or so to mount the rudder; I'd like to get one more coat of varnish on the rudder head and blade before mounting the hardware.

And also, with a bit of regret, I finally applied the registration number and yearly renewal sticker to the bow on either side of Fuggles. It's not quite as bad, aesthetically, as I had feared. And what's more, it will be required if we are to sail her- as soon as this weekend. NWS forecast is calling for 6-12 mph winds, which would be ideal for the first sailing shakedown. Perhaps a Friday afternoon rigging, and a Saturday sail. Stay tuned! Total Hours 97.75.

Wednesday, July 19, 2006

Showtime!


Announcing the latest Intron Films release: The Building of Fuggles. This is a short documentary of the construction process of a Passagemaker Dinghy. Hope to soon have a "Directors cut" with additional material after the sailing shakedown cruise in a week or so.

Windows media viewer file, 14.7 MB. Duration 4:35 minutes.

Sunday, July 16, 2006

What's in a name?


For the name of our Passagemaker dinghy, Kathy and I agreed on Fuggles. The name has significance for us on several levels. Fuggles is the name of a variety of hops that are used to flavor several types of traditional English ales, including the ale style called India Pale Ale, or IPA. This is special, since it ties in one of my other hobbies- homebrewing. Kathy started me on the hobby during our first Christmas together, and since then, I have won a few awards with my brews, and had lots of fun along the way. Fuggles was christened with a splash, not of traditional Champaign, but of an IPA from Portland, Maine. Although Fuggles was built in Alabama from a kit made by a Maryland company from wood grown in Africa, the spiritual home of all wooden boats must be Maine. The state is home to many shipyards that craft fine sailing and motor vessels of wood using traditional techniques. Also, the famed Wooden Boat School is located in Maine, and is instrumental in preserving the skills needed in the building and maintaining of beautiful wooden boats of every type.

It is immensely satisfying to sail in a boat one builds himself. May Fuggles sail safely for many years to come.

Delivery

Kathy and Peter are pleased to announce the arrival of Fuggles, at 2:52 p.m. on July 16, 2006. Fuggles weighed in at approximately 95 lbs, and measured 11 feet, 6 inches long. The christening included appropriate words from Peter, and an inaugural splash of Shipyard IPA. After a difficult 9 months gestation, Fuggles took to the water eagerly, and swam well. The proud parents look forward to the development of sails in the very near future.

Relaxing

After a long week at work, nothing beats getting out on the new boat.

Rowing

Launch

Rumors

Yesterday afternoon in the mid-summer Alabama heat, the fifth and final coat of varnish went on the topsides of the Passagemaker. The result was a satisfying deep gloss that complimented the white of the hull bottom. This morning the oarlock sockets were installed, with care to embed the screws in silicone caulk. Even though the boat is not yet fully fitted out for sailing, she could be rowed. Could a christening, launch, and rowing trial take place later today? Stay tuned... Total Hours 97.00.

Saturday, July 15, 2006

Almost there

As the early morning temps leapt into the upper 80s with humidity levels to match, I rolled my Passagemaker dinghy out for one last wet sanding session. This was just a light going-over with 320-grit paper before the fifth and final coat of varnish. Since my sequence is a little out of whack, the ancillary parts like the daggerboard, rudder, mast step and spars only have a couple coats of varnish. I'll have to catch them up over the next week. I hope to get the final coat of varnish on later today, which will then leave one more coat of the white bottom paint for next week. It's almost hard to believe the project is almost done. It's looking more and more likely that CLC's estimate of 100 hours to complete the sailing version of this standard Passagemaker is pretty darn close. At least for this builder. Total Hours 96.25.

Thursday, July 13, 2006

Fab four

Another day, another coat of varnish. This morning was coat four. By now I have finally learned some basic lessons. Like not coating the rub rails before I have to lean in and do the bottom panels; less varnish gets on my shirt that way! This weekend should see the last coat on the interior, for now. Then next week, a final coat of white paint on the outer hull, some additional varnish coats on spars and fins, and installation of the hardware and rigging. Launch is officially projected to be August 4, which is also Coast Guard Day! Total Hours 95.50.

Tuesday, July 11, 2006

Thank you sir, may I have another?

As with other stages of this boat building project, I quickly have fallen into a comfortable routine with the application of the topside varnish. After the coat on Sunday, the boat was allowed to dry for about 24 hours. Then last night I gave it a good sanding. This was my first attempt at wet sanding, using some 320-grit paper (made in Finland- not the horrible cheap stuff from India I have been using) and keeping a wet surface, I was really surprised how well things looked after the quick sanding session. Then this morning before work, I applied the third coat of Interlux Schooner varnish. A nice gloss is starting to develop, as well as a little depth in the varnish layer. Tomorrow evening, the cycle starts again for coat 4.

I also received my registration stickers from the Decal Zone. Very quick service, and the vinyl registration numbers look great. Total Hours 94.00.

Sunday, July 09, 2006

Layer upon layer

When I could no longer resist the temptation, I went out and put a second coat of varnish on the boat. My concern was attracting bugs by using lights in the evening. But daylight lasts long enough now that it was still pretty bright outside, and so far, bugs haven't been a problem. The second coat seems to have covered the sanded, crazed spots pretty well. Time will tell if I avoided the same mistake with this second coat. It was a little harder to tell this time where varnish had already been applied, and where my wet edge was. But I am pretty sure everything got a second coat. My neighbors must have thought it strange to see me dancing around so much, craning my neck to catch a reflection of light at an angle to reveal a sloppy brush stroke here or a dry spot there. But with the planned second coat done a little ahead of schedule, I should be able to sand tomorrow evening, and be ready for the third coat Tuesday morning. Total Hours 92.50.

Yard, Sail

Prep work was the order of the day today, as I turned my attention to the spars. A number of holes had to be marked and drilled in the gunter yard and the main boom, so that I could begin varnishing these parts. The instructions mention that it is surprisingly difficult to epoxy coat these pieces, and that multiple coats of varnish are sufficient to protect them. But before I could do this, a number of holes had to be drilled. In the gunter yard, there are holes positioned all along the spar that correspond to grommets in the luff of the main sail. These are the points where the sail will be lashed to the gunter. Also, a hole is drilled in the long axis of the gunter at its center for the attachment of the main sail halyard. Along the main boom, holes must be drilled for mounting of two mainsheet blocks, the main clew outhaul, and the boom downhaul. When these were marked, I drilled each with a 1/4" bit. I also mounted the main mast stays and jib halyard block to the masthead. Finally, three cleats were installed at the base of the main mast which will be used to belay halyards and the main sail downhaul.

After that, I rolled the boat out into the fresh afternoon breeze and gave the first coat of varnish a light sanding. I was disappointed to find several areas of crazing. This apparently resulted from a too thick coat of varnish. Since they were mostly on horizontal surfaces, there weren't drips or runs, but as the overly-thick layer dried, it crinkled up into a pattern much like a fingerprint. So extra sanding mostly removed these areas, and served as a reminder to be extra careful about applying a thin layer when I put the second coat on tomorrow morning. Total Hours 91.75.

Saturday, July 08, 2006

Sightings

Recently, I posted a link to the review of the Passagemaker dinghy by noted marine architect Robert H. Perry, which was published in Sailing Magazine. To confuse matters, now the July issue of Sail Magazine (no "ing") has a short article on a selection of hard dinghy tenders. Read the article here. The article deals primarily with manufactured plastic models, and only mentions the Passagemaker as an aside. It is good to see, however, that the Passagemaker compares very well with the more modern boats in terms of size, weight, capacity, and price. And none of the plastic fantastic tenders have the character and class of a hand-built wooden dinghy!

Shine on!

In the calm, cool morning air, my Passagemaker Dinghy got her long-awaited first coat of varnish. For the bright finish, I am using Interlux Schooner varnish. This product will give a high gloss, while also giving UV protection to the underlying epoxy. On the whole, I was pleased with how the first attempt went. I was able to experiment with the application characteristics of the varnish on the daggerboard, which got a first coat some time ago. There certainly is a lot of surface area on the inside of this boat! I used a roller to cover some of the larger, flat expanses. But a foam brush was still needed for tipping in, and also for the many tight spots and corners. Keeping the coat as thin as possible, I think I managed to avoid many drips and sags. The entire interior and exterior transoms and sheer strake took just about one-half quart to coat. I have three quarts on hand, which will give me enough for the recommended 5-6 coats that are needed for a durable finish. Even after this first, I am encouraged with how things look. And now, I'm more eager than ever to get out on the water! Total Hours 90.50.

Friday, July 07, 2006

Papers, please

This morning, I surmounted another hurdle before being able to sail. Some time ago, I obtained a hull serial number, as required for a home made boat under Alabama law. So today, I finally got around to once again visiting my favorite place, the county license office, and purchased the necessary boat registration. This number, different from the hull serial number, is more like a car's license plate. Only this number and yearly renewal sticker must be prominently displayed on both sides of the Passagemaker dinghy's bow. I thought I might be able to avoid marring the appearance of my boat by claiming it was primarily a non-mechanical powered boat under 16 feet in length, but there is specific language in the law concerning the registration of sailboats of any size. And since that is the way I will primarily use my Passagemaker, I figured I shouldn't try to cut corners. So an hour and $12 later, I have a registration number and some large yearly stickers. If I must ruin the look of my boat, I thought it best to minimize the damage. So instead of address number stickers from the hardware store, I have found a company that will print boat registration numbers in a one piece sticker and in a variety of colors and fonts. My order goes off today!

Thursday, July 06, 2006

Second paint coat


The exterior hull went through another sanding and painting cycle last evening and early this morning. Last evening, I moved it out and sanded it lightly after the first coat of Interlux Brightside white. There was one drip, a few specks of dust or larger debris, and a couple of hairs (from me or the resident cat, I can't be sure). I started sanding with 220-grit paper on my orbital sander, but found this left an undesirable brownish tinge to the paint that was the same color as the grit in the paper. For whatever reason, the same paper left no mark if I sanded by hand using a sanding block. So this is what I did in the humid evening air. After that workout, I wiped down the dust from the hull and moved it back into the shop, then masked the edges again with tape and newspaper as previously. I didn't paint in the evening, since the garage door needs to be open for ventilation, but the lights would attract too many bugs in the evening twilight. So early this morning, the hull got its second coat of paint. The sharpness of the shine seemed to improve noticeably after the second coat.

Before applying the third coat of paint using the method above, I may do some varnishing of the interior. The main reason is that my assistant for moving the boat will be unavailable for the next week. But if I flip the hull over, I can put it on the trailer and move it out for sanding and in for varnishing single handedly. Total Hours 89.25.

Tuesday, July 04, 2006

Hull paint


After an unsatisfying sanding session yesterday, things began to look up this morning. I masked off the hull again, and then applyed the first coat of paint. For my "standard" Passagemaker Dinghy paint scheme, I chose Interlux Brightside White (5349), a one-part polyurethane high-gloss paint. Using the roll-and-tip technique in which a thin layer of paint was applied with a foam roller, and then bubbles left by the roller were removed with quick, delicate swipe with a foam brush, things went fairly quickly. I was happy with the result- no sags that I can detect yet, and only a couple of small pieces of debris, i.e. a hair or two, or dust flecks. Not yet a mirror finish, but one I was proud of. It took about half of a quart for the hull bottom, and the manufacturer calls for at least two coats. I have enough paint supply for four coats, if I have that much patience. The one difficulty is a few tight spots, like the one between the #1 panel-bottom panel lapstrake joint and the bow end of the skids. This is a narrow spot where my roller wouldn't fit. I have a handle for a smaller, 2" roller, but I need to get some refills for it today. Total Hours 88.00.

Monday, July 03, 2006

Primers Sanding

An afternoon thunderstorm brought a bit of much needed rain to central Alabama, while also cooling the temperature from the upper 90s to the mid 70s. It was these conditions that I had for the sanding of the primer coat on the exterior hull. I was only a few minutes into the process of sanding with 120-grit paper when I found the conditions were less than ideal. The high humidity caused the primer to clog the paper fairly quickly. This is due to the titanium dioxide in the primer, which absorbs the moisture from the air and becomes gummy. The optimal technique is to prime and get the first paint coat on the boat in dry weather. Unfortunately, low-humidity days are few and far between in the deep South this time of year, even during a drought. So I pressed on, hoping for the best. The surface is fairly smooth, and was then wiped down and cleaned. All is ready for the first coat of true paint. Total hours 87.00.

Sunday, July 02, 2006

Pre-Kote


Bright and early this morning, I began the process of painting the exterior hull. There are any number of schemes for painting a small sailing pram; the variety is only limited by the imagination of the builder. However, I opted for a scheme that is best called the "standard" finish. By this, I mean a finish where the exterior bottom of the hull is painted white, leaving the exterior top strake and all of the interior finished "bright", or varnished. This is the scheme used by CLC for their showroom model Passagemakers, and I think it is a simple, elegant decor. But even within this basic finish, there are small variations. Gloss or satin varnish? Where to finish the paint edge on the transoms- leave the strake edge bare, or paint over it? Painted or bright skeg? The minute details can be endless. I chose to adhere to the K.I.S.S. principle, and to keep things as simple as possible.

Accordingly, I masked the top strake and the transom (I like the look of a little plywood edge, so I'll keep the strake ends visible) with 3M blue masking tape, medium adherence. Then I gave the hull a first coat with Interlux Pre-Kote primer. This is a high-build primer, designed to flow well, yet fill small imperfections in the surface. I found that about half of the 1-quart container was enough for one coat on the hull. I am still debating whether to add a second coat. Already, the hull looks nice. The scarfs in the strakes are well hidden, and even the one or two stitch holes I hadn't completely filled are pretty well hidden. The primer went on most of hull with a small foam roller, but I had to resort to a small trim brush to get to some small corners around the skids, and in the skeg handle. Total Hours 86.25.

Saturday, July 01, 2006

Washdown


Finally, the day came to get the boat ready for painting. This involved its first trailer trip, to a new house we have recently purchased. It is only a short distance from the old one, where all the boat assembly had been done. But it seemed like a good time to bring it to a new shop, which is nice and clean, and free of sanding dust. So the dingy was transported on its trailer, and washed down in the driveway of our new home. A quick spongebath was needed to removed sanding dust and other surface contaminants prior to painting. After a thorough wash and rinse inside and out, she was moved to the new shop (garage) and allowed to dry. Masking and priming on the bottom hull are next!

Thursday, June 29, 2006

So long, sanding!

And so, it was on a warm but unseasonably comfortable June evening that I completed the sanding of the boat. Tonight it was a fairly quick task to go over those spots where I added one more coat of epoxy, to fair them in with the rest of the sanded hull. As mentioned before, it's not perfect, but good enough. I even wiped down large portions of the hull with a soaking wet rag to remove the large amounts of dust. What was underneath was a suitably smooth hull, ready for painting and varnishing. With a holiday weekend of sorts ahead, I have ambitious plans to completely wash and clean the hull, and mask off the bottom which will receive first a coat of primer, then a couple of coats of gloss white paint. Total hours 85.50.

Wednesday, June 28, 2006

Good Enough?

When is a boat sanded enough? It becomes a really metaphysical question at some point. I'm inclined to go with the answer that was given recently by a member of the Passagemaker Dinghy Forum who said,
When you have reached the point where there is absolutely no question it is “good enough”, take a break then go back out for a final run around the boat with a bare hand and a strip of 220-grit. Then quit. For good.
I think I have reached that point. I finished up the session last evening with a pass of the 220-grit. The boat is smooth, overall. Small patches, mostly in crevices, could still use some work. But as this is intended as a working boat and not a show boat, I'm ready to call the task complete. Much more work could be put in, with less and less payoff. As a final chore, I added one more coat of epoxy to the skeg and skid strips. These will be sanded later today, and then the boat will be ready for the final phase of painting and varnishing! Total hours 85.00.

Tuesday, June 27, 2006

Prodigal sander

Armed with a new pack of sandpaper, and (finally) some free time, I was able to return to the final stretch of sanding last night. The starboard exterior of the hull was all that remained to be done, so I 120-gritted my teeth and got down to the job at hand. Apart from a few nasty spots of ugly epoxy drips, this side of the boat was already in pretty good shape. It got a rough going -over with the belt sander, followed by the orbital sander with 120-grit paper. One more session with some 220-grit, and I will finally be able to start masking and priming the bottom. It is so good to get back to boat building! Total hours 84.50.

Thursday, June 01, 2006

Belt up!

Sanding continues on the exterior hull. As I had hoped, things are going quicker than with the interior. This is due to a combination of unobstructed surfaces and the feasibility of using a belt sander. I was able to knock down some nasty drips very quickly with the belt sander, and then went over the hull with the 1/4 sheet orbital and 120-grit paper. Though wet sanding is not called for at this point, I ended up doing a fair imitation of it, what with the heat and all the safety gear on my head. I ended up in some awkward contortions so as to avoid dripping sweat on newly sanded surfaces. Half the hull is now done; another session or two of sanding, and I should be ready to start painting the hull. Total hours 83.75.

Wednesday, May 31, 2006

Summary Judgment

After contending with several errands and the inevitable traffic jam on the tedious commute home, I rationalized that I could take a night off of sanding this evening. The fact that Birmingham tied a record for today's high temperature had something to do with the decision, I have no doubt.

I was able to locate a copy of the June issue of Sailing Magazine. This month's issue is especially interesting because it contains a review of the Passagemaker Dinghy by noted yacht designer Robert H. Perry. I understand these reviews are usually available on the magazine's web page, but the current issue does not yet appear online. For the curious, you can see the review here.

Tuesday, May 30, 2006

Bottoms up!

With the interior finally (!) sanded, tonight was the point when the hull was flipped over to sand the exterior. So it was back onto the sawhorses, which were now covered in old towels to pad them, so the boat could rest on the bow and stern seat surfaces without damaging the hard-won smooth surfaces. The exterior sanding will apparently go a bit quicker. The large expanses of smooth surfaces with outside curves meant that the faster belt sander could be used. I was able to do about a third of the hull before the heat got to me and the 120-grit belts that I had on hand were expended. As that point, I mixed up some unthickened epoxy and gave a first coat to the bare wood of the skeg and skids, something I hadn't done the last time the boat was bottom up. Total hours 83.00.

Monday, May 29, 2006

Back to the grind

May has been a busy and productive month for me. Unfortunately, the productivity hasn't been in the area of boatbuilding. But after some family obligations, a trip out of town, and some business dealings, I was finally able to return to boat sanding this evening. I touched up some last spots with the 120 grit paper, then gave the interior a light going-over with the 220 grit. It looks virtually ready for varnishing. But first, I will have to turn my attention to the exterior, which is as yet untouched. In fact, the skeg and skids still need to be epoxy coated. One good thing is that an early summer has come to the deep South, and so that epoxy should set up quickly! Indeed, if there is a recipe for messiness, in includes sanding dust, 90-plus temps, and sweat. But after a cool shower, I am revived, and excited to finally get back to my Passagemaker dinghy. Total hours 82.00.

Wednesday, May 03, 2006

Smooth interior

After a tedious and interrupted period, the interior of the Passagemaker is now ready to varnish. Not flawlessly, mirror-smooth. But good enough for my purposes. There remain a few spots to touch up with the finishing 220-grit paper, but for the most part, everything inside the hull is ready for varnish. The next job will be to flip the boat over and get the exterior hull ready for paint. I anticipate that job will go a little faster because of the lack of nooks and corners in the hull exterior. Let's hope.

Meanwhile, over on the Passagemaker Dinghy builder's forum, several other builders are nearing completion of their boats as well. One of them referred to this group of boats as "The Class of 06", a label I thought well enough of to appropriate here. Since the Passagemaker Dinghy kit is still a relatively new product from Chesapeake Light Crafts, there are very few that have been completed at this point. Many, however, are in the pipeline, and are nearing completion. In the next few weeks and months, "The Class of '06" will be hitting the water. It will be great to see the product of so much hard work pay off in sailing and rowing enjoyment for their owner/builders. Total hours 81.25.

Friday, April 28, 2006

Nuts!

A little over a month ago, I assembled my boat trailer, only to find that the kit was missing a crucial part. In fact, without the spindle nut, one of the wheels was held on very precariously by only a cotter pin. I contacted the place where I bought the trailer, and they are still in the process of sending me a replacement part. In the meantime, I searched several hardware stores in the local area, but couldn't find a simple, yet hard-to-find nut. Finally yesterday, I received a package from a different online store: my 3/4", 16-thread castle/slotted/spindle nut arrived, and now both wheels of my trailer are securely fastened, ready for the road.

I hope to finish the sanding of the interior this weekend. Then I can flip the boat over to do the exterior. I anticipate the exterior will go a little faster. Then painting and varnishing can begin!

Wednesday, April 26, 2006

Asymptote

as·ymp·tote n.
A line whose distance to a given curve tends to zero. An asymptote may or may not intersect its associated curve.

As the building of my Passagemaker dinghy nears completion, progress seems to be slowing. That is clearly one figurative definition of asymptote; advancing towards a goal, but never really getting there.

This past weekend, I took a quick trip up to Chicago to visit family. Before that, some household projects required my attention. And on Monday, I spent the evening mowing the lawn, a project that was made more cumbersome by the need to change the oil in my mower, clean and re-thread my string trimmer, and dig the leaf blower out of the corner of the garage where it has sat, unused, all winter. So last night, I was very eager to do some sanding and perhaps get the boat nearer to a stage ready for varnishing. About 45 minutes into the session, my quarter-sheet orbital sander gave out. This led me down the time-consuming path of disassembling it, then reassembling it, only to find that I couldn't discover why the motor would run, but the pad didn't vibrate. So, frustrated and dusty, I cleaned up, had a nice dinner, then searched out my receipt in order to return the sander to Home Depot where I bought it in November. I got there only to find that they don't exchange electric devices after 30 days. To take advantage of Black and Decker's two year warranty, I had to take it to an authorized repair shop. Fortunately, there happened to be one near my workplace. So I took it there this morning, anticipating a lengthy repair process, and wondering what I could do on the boat in the meantime. But much to my surprise, the fine folks at the DeWalt Authorized Service center on Green Springs Hwy in Birmingham were able to exchange my sander for a new one right on the spot. So I am back in business. For those of you keeping score, this is the second sander I have burned up on this boatbuilding project. Let's hope this third one will last long enough to complete it. Total hours: 80.

Monday, April 17, 2006

The varnished truth

I'm not enough of a biblical scholar to know if Noah ever got tired of sanding the Ark. But I know I am. And I'm guessing my little boat isn't much more than even one cubit long...

But a part of my Easter Sunday was spent in the holiday tradition of boat sanding. The rub rails, daggerboard, rudder head, rudder blade, and mast step all got a good sanding before being coated with a second coat of epoxy. After all that, I even had some time and energy left for some more sanding of the hull interior. Even after an initial going-over with 120-grit paper, there are some rough, orange-peel like sections in the hull interior where the epoxy application wasn't the greatest. Still more work to be done there.

So tonight, I gave that second coat of epoxy on the daggerboard another sanding. I hit it with the 120, then a pass with 220-grit. It looked good enough that curiosity finally overtook me, and I popped the top on a can of Interlux Schooner Varnish. My reading had prepared me for how touchy the application of varnish might be. So I had a small roller for application, and a foam brush standing by for "tipping in", or removing bubbles left by the roller. I was surprised how easily the varnish went on the daggerboard (after I had carefully wiped it free of sanding dust). It didn't even seem necessary to tip in very much. I was careful to apply a thin coat, and all looked good as the daggerboard lay flat. But as soon as I lifted it to do the other side, sags appeared. With subsequent coats, I'll have to be even more careful to put down thinner coats. But overall, I was pleased. It is said one must do a good job sanding, because varnish won't hide any flaws. But I was pleased to find some of the very small sanding swirls and lines did get covered up. Finally, I knew bugs would be a problem with the fresh varnish surface, so I was careful to not turn on my powerful worklights in the open garage as twilight set. But even with no lights, bugs were attracted, and a couple are now stuck in the finish. I'll have to do further coats at a time other than twilight, and most likely with the garage door closed. Fortunately, the garage has a couple of screened windows I can open for ventilation. All in all, a good experiment; one I should be able to improve upon. Total hours 79.25.

Saturday, April 15, 2006

The Marine Police always knock twice

This past week, some other endeavors kept me from boatbuilding. But that isn't to say that no advances towards sailing were made. The Alabama Marine Police assigned the hull serial number, which will allow me to register my Passagemaker dinghy. How they did this was a bit surprising. A while ago, I sent off the form requesting a serial number, as is required in the state for home built boats. I assumed the description of my boat in the form would be enough for them to send me a number. But nowhere in any of my reading was there a mention of a personal visit by an armed Alabama state trooper of the Marine Police division. So when I arrived home from work one day this week, my wife told me the story of being surprised by a knock on the door, and finding a law enforcement officer waiting there. It turned out he merely had to inspect the boat and place a sticker on the transom- and voila!- I now have my serial number. Lucky for me she was home from work that day! The next step is a return to the driver's license office to pay the registration fee, and obtain another number for another sticker to apply, further ruining the appearance of my boat.
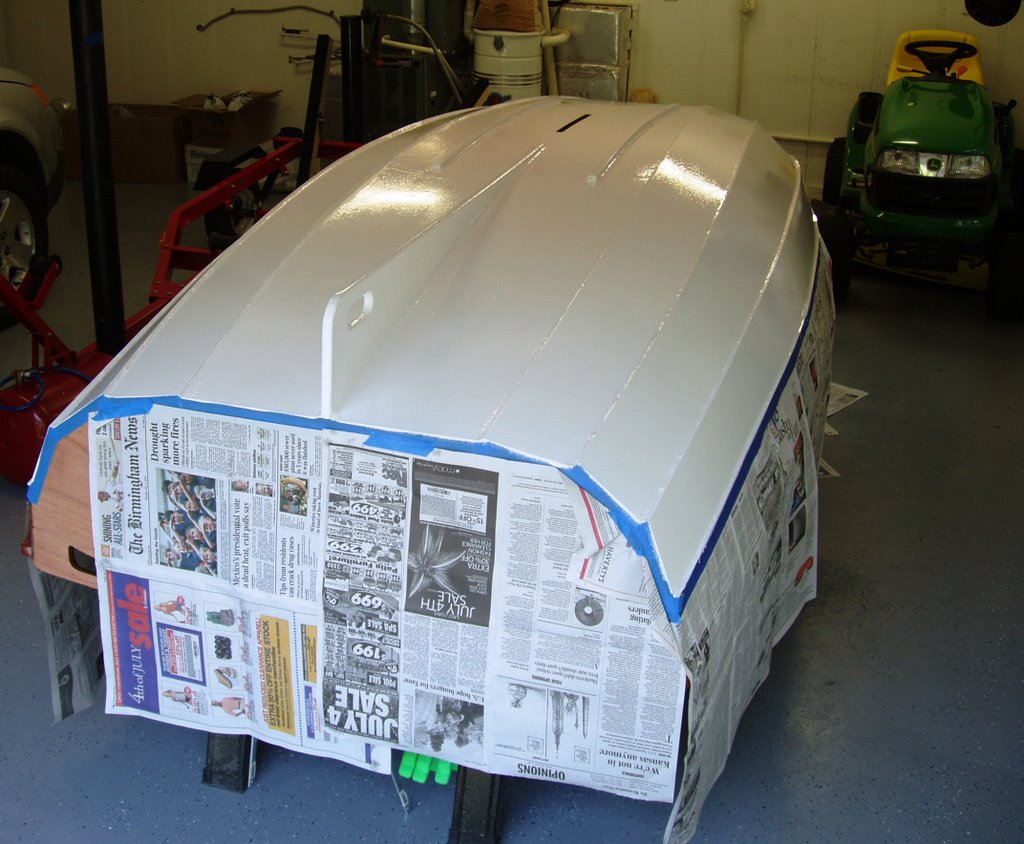
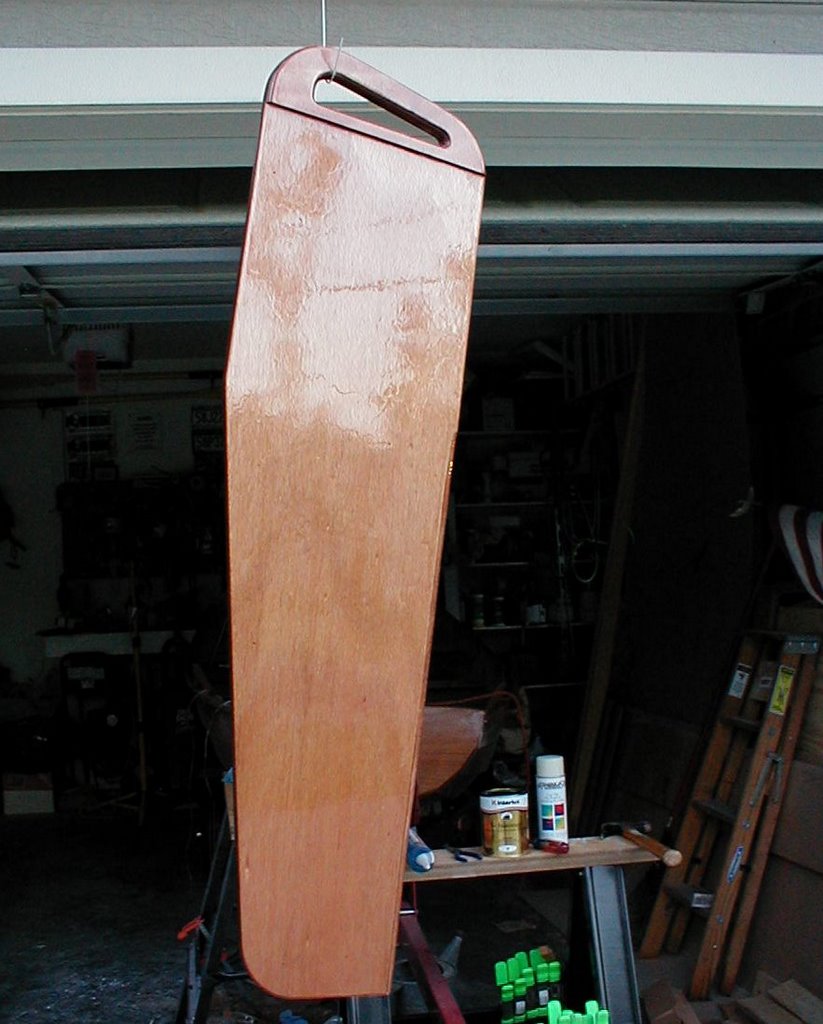
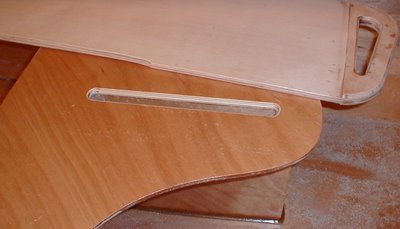
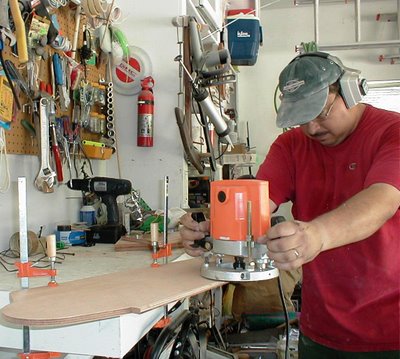
Today was a little change from sanding. I finished some odds and ends I have been meaning to get to for a while. Although earlier I had shaped and sanded the daggerboard, I hadn't yet done the rudder blade. I finished that today, rounding the leading edge and sanding the trailing edge to a fine taper. I also routered the mast step plate, and some edges of the tiller head. Then several areas got a first coat of epoxy: rudder parts, daggerboard, rub rails, and some bare edges in the hull, such as daggerboard slot, motor pad and transom knees. Sanding continues tomorrow. Total hours 77.00.

Sunday, April 09, 2006

Sanding continues...

A little bit each night. That's my tactic for dealing with the sanding phase of building a Passagemaker dinghy. Well, not so much a tactic, really, but a consequence of some other things going on right now. So at least I am making progress. The interior has been given a going over with 120-grit paper, but some rough spots remain, a result of some inattentiveness while applying the final overall coats of epoxy. Those drips take a long time to sand down. But at least the bronze screws holding the bottom skeg and skids are nice and bright now! The sanding is indeed tedious, but at least in a couple areas where I started the 220-grit sanding, the result is very satisfactory. There won't be too much more to blog about as the sanding continues. But in the meantime, check out these sanding songs. CLC completed a recent month-long contest to write a "sanding song" and recently announced the winners. Total hours 75.25.

Also, I finally tackled a problem I had been putting off. Earlier, I had installed a trailer hitch on our Saturn VUE. But for months I had been avoiding finishing the job by installing the wiring harness. The main stumbling block was running a dedicated wire from the vehicle's battery to the harness switcher in the rear of the vehicle. One cannot simply splice the trailer wires into the VUE taillight wires because there is insufficient current in that circuit to drive both taillights and trailer lights. Instead, a logic switcher is spliced in, and is connected to its own power supply. I puzzled over several routes to run the power cable from the battery, through the firewall, under plastic panels, and to the compartment in the rear of the vehicle where everything is connected. I finally did it this morning, and after some fumbling with a rubber grommet in the firewall, I got the power wire in place. A clean installation, all ready to splice in the controller and the trailer harness plug.

Tuesday, April 04, 2006

Sanding begins

After tending to some much needed -- and long overdue-- yard work and landscaping for the past couple days, I was able to return to boatbuilding for a short time this evening. Indeed, there seems to be at last some light at the end of the tunnel. Some small building tasks remain, such as assembly of the rudder, and some rigging. But the main task ahead now is finishing the hull. Even here, odds and ends remain. The rub rails and skeg are needing to be epoxy coated, as well as some bare edges of wood, such as the upper daggerboard trunk slot and newly routered edges of the transom knees. But the tedious job of sanding is the one main obstacle between me and sailing. So tonight I began the journey. The belt sander is too brute a force for this job, so the smaller and slower quarter-sheet orbital sander will be the tool that will get the most use. There is plenty of tight spots that will require sanding by hand, also. The entire hull needs going over with 120-grit, and then 220-grit paper. I understand some builders go even finer before applying the paint or varnish. But I already understand I have accumulated too many small building flaws to ever achieve a contest-winning, show boat appearance. I am more realistically hoping to arrive at a respectable looking boat that will be durable, a true sailer, and decent looking. The journey begins... Total hours 73.75.

Sunday, April 02, 2006

Design lineage, part II

Earlier, I mentioned a book by Frank Rosenow, and the obvious design influences derived from the Swedish eka working boat. There is a further bit of design heritage in the Passagemaker dinghy that should be mentioned. The famed small boat designer Sir Jack Holt also had his role influencing the design of the Passagemaker with his Mirror racing dinghy. This role is acknowledged by the Passagemaker designer himself, John C. Harris, who says, "Both the Mirror and the Passagemaker are prams with gunter-sloop rigs, which is sort of my wink-and-nod to Holt." Indeed, the economical gunter rig is found in both boats, combining a fast, weatherly Marconi-style rig with the convenient short and transportable spars of a gaff rig. But beyond that, the serious racing purpose of the Mirror is apparent: the design sports a finer bow, a planing hull, and the more complex and versatile running rigging of a class racer. Many mirrors are also equipped with hiking straps and trapeze wires for hard sailing, in contrast to the simpler, all-purpose configuration of the Passagemaker. Large numbers of Mirrors exist today, and Mirror clubs are active in England. There, the fine art of dinghy sailing is refined, and subtle points of rig tuning discussed. Passagemaker builders have Jack Holt's Mirror dinghy to thank as another design influence.

Saturday, April 01, 2006

Risers, knees and pads

Several little things got done today. The biggest job was to finish the rub rails: The ends were trimmed and shaped, and then the two layers of the rail were sanded down into one smooth rail. At that point, the edges on top and underneath were shaped with the router and 1/4" roundover bit. After that, the fitting of a few last items could be done. The oarlock risers, little tapered blocks of wood to which the bronze oarlock sockets will be mounted, were epoxied to the rubrails with cabo-sil thickened epoxy. There are two rowing stations on the Passagemaker dinghy, and so the two pairs of risers are mounted 14" aft of the midships bulkhead, and 12" aft of the forward bulkhead. The motor pad's edges were rounded off with the router and it was then mounted on the stern transom. Finally, the bow and stern transom knees were "tack-welded" in place. The bow knee required some work, as the angle between the bow seat and transom was slightly smaller than what the knee was cut for. A little sanding and router edging prepared the knees for tack welding, which is to say, cabo-sil epoxy on the edge surface of the knees to hold them in place. They were made plumb and square, and taped to hold them in place while the epoxy cured. Once cured, a peanut-butter epoxy fillet will be applied around each one. Total hours 72.75.

Thursday, March 30, 2006

Seat touch-up

It was a quick job to touch up the fillets on the bow seat. Adding to the base set down previously, I filled it to a level flush with the seat surface, and shaped it into the contour of the bow. The only tasks that remain are to install the bow and stern transom knees, motor pad, and oarlock blocks. It is amazing how rigid the hull has become with the final addition of the seats; such a long way from the collection of flexible strakes that I started with a few months ago. Total hours 70.25.

Tuesday, March 28, 2006

Bow seat

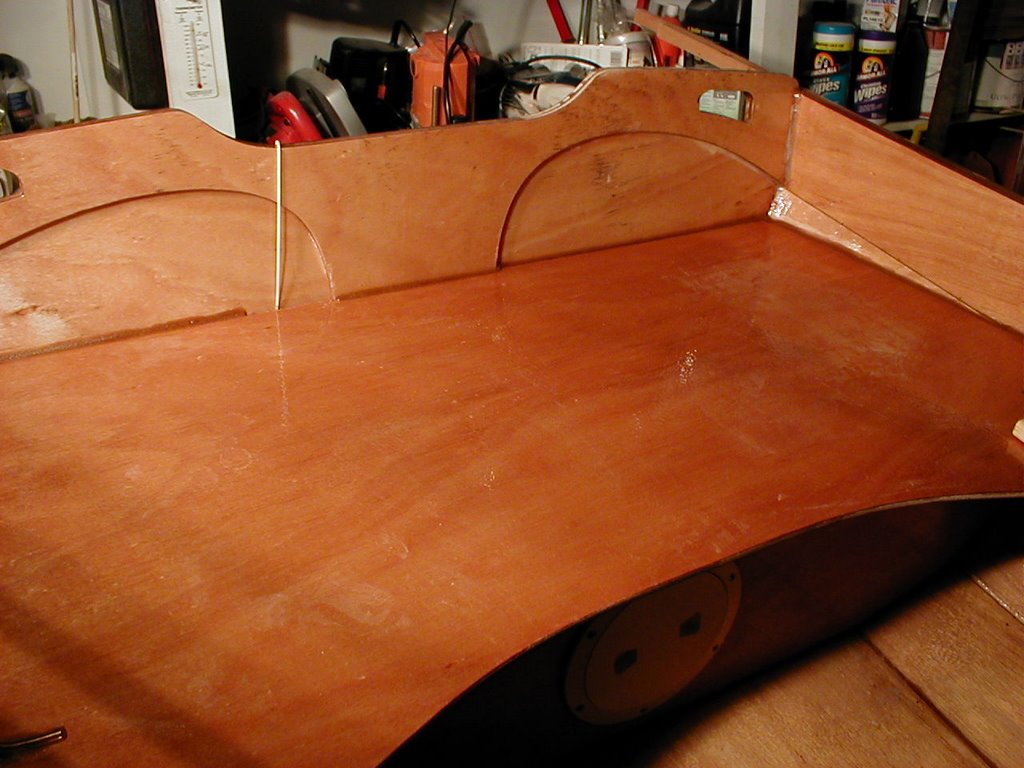
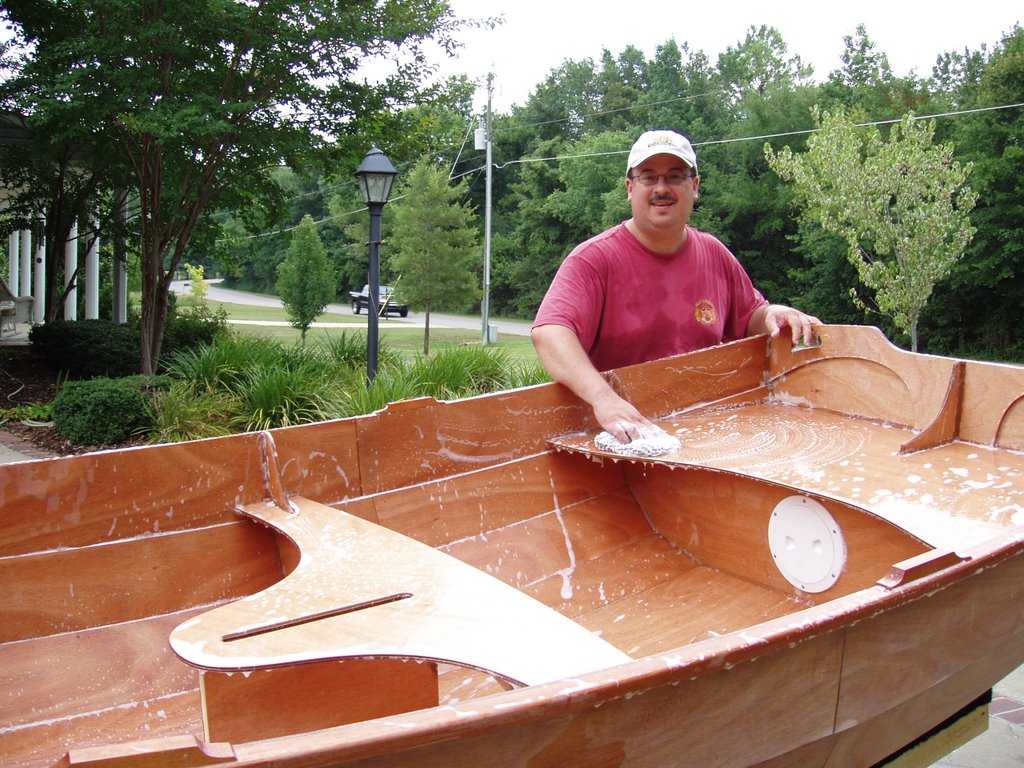
Another batch of peanut butter epoxy, another seat. The bow seat presented its own obstacles during the installation. There was a sizable gap--about 3/4" -- between the #3 and #4 strakes and the edge of the front seat about 8" aft of the bow transom. Whether this is normal, or due to a flaw in my construction, I can't be sure. But it will require a process of building up some layers of epoxy to fill the gap. The space couldn't be spanned by one fillet of epoxy, but will instead require a second fillet be applied later over the one laid down tonight. Apart from the gap that ran for about 10" on either side of the bow seat, everything else went well. There was a very slight curve in the piece of plywood that makes the seat, so I added some weight in the form of my homebrewing propane tank to maintain a tight contact between the seat and the bow bulkhead. In all the rest of the edge, a standard fillet could be applied and smoothed. Total hours 69.75.

Monday, March 27, 2006

Aft seat

I tried my hand at the permanent installation of one of the seats tonight. It looked like the stern seat would be easier, so I started with that one. After mixing up a batch of peanut butter thickened epoxy, I laid a bead on top of the bulkhead so as to provide a good seal. Using the zip-loc pastry bag dispenser, I also lined the edge of the stern transom where the seat would meet it. When I put the seat in place, I found a small gap of maybe 1/8" between the seat edge and the stern transom. Accordingly, the seat had a tendency to sag a bit there. To support it, I hooked a wire coat hanger under the edge, and bent it over the top of the transom. I then put a small fillet of thickened epoxy around the perimeter of the seat, except at the location of the wire support. After a couple of hours, the fillet was smoothed as usual with an alcohol-dipped gloved finger. I'll fill in the remaining gap after this fillet cures, resulting in a completely air-tight chamber. Total hours 69.00.

Sunday, March 26, 2006

Lay Lake

Fully intending a day of boatbuilding, Kathy and I instead took a Sunday drive to the site of our planned first sail of the Passagemaker dinghy. I refer to Lay Lake, a hydro-power reservoir on the Coosa river. The lake is part of a system of lakes created and maintained by Alabama Power. Lay Lake is one of the smaller in the system, but after our visit today, we saw it will be plenty big for sailing. We checked out a free public boat ramp that at about 25 miles away, is the closest to home. It is a nice facility, with two cement boat ramps, nearby docks, and plenty of pull-through parking for boat trailers. Also, just down the road is a second boat ramp facility at a commercial marina called "Paradise Point" marina. Curiously, the road to paradise is strewn with potholes. The free public ramp at Beeswax park is much nicer. It off of the main lake in a small protected cove. Perhaps in a month, we'll be able to have a little boat christening ceremony, and go sailing.

After returning home, I did a quick oil change in my car. After that, I had time to cut the upper opening in the daggerboard trunk. This was done in the same way as the lower one, by drilling a 1/2" starter hole, then using the router with a 1/2" flush-cut bit to cut the slot even with the interior surface of the trunk. The edge was then shaped with the 3/8" roundover bit. A slight unevenness at one end was the result of a stray glop of epoxy that was squeezed out of the joint which the bit bearing rode over. This will be smoothed out later by hand.

Thursday, March 23, 2006

Rub rail redux

Over the last two nights, I've continued to lay up the rub rails on the port side of the Passagemaker dinghy, and tonight the task was completed. Turns out it's true what they say about practice making perfect; by the fourth and final strip, I was getting pretty good at applying just the right amount of thickened epoxy, and attaching all the clamps to hold the strip in place. Once this final strip completely cures, I can trim the ends and shape them, sand the laminated strips smooth, and give the edges a nice shape with a router. After that, things enter the home stretch, at least as far as major boat construction goes. I hope to get the fore and aft seats in place this weekend, after which there are only a few small parts to install: bow and stern knees, and motor pad. Then the extended period of finish sanding, painting and varnishing begins.

Yesterday morning, I stopped by the local License Office to pick up the forms for registering the boat. This is never my favorite place to visit. Nonetheless, Alabama state law requires that motor-driven and sailboats be registered. (Whether this also includes vessels like the Passagemaker dinghy when used as a row boat is unclear.) The first step in this process will be to apply for a hull serial number from the state Marine Police, a division of the state troopers. Once this number is assigned to a newly homebuilt boat, the registration and yearly fee is obtained from the county License Office. Fortunately, Alabama has no provision for titles or license plates for boat trailers, so I am spared that hassle. Total hours 68.25.

Monday, March 20, 2006

Noah's dinghy

On such a rainy night, it seemed appropriate that I should be building a boat. If the storm lasts much longer, I'll have to begin gathering two of every animal. My task tonight was a brief one: the second layer of the starboard rubrail was attached with cabo-sil thickened epoxy. It was a fairly quick process, and I only charged the Passagemaker dinghy building total with a half hour's effort. But I continued on with the final touches of the trailer assembly. This included the wiring harness. A simple enough affair, made up of four wires and a ground strap. But fishing the wires from the hitch through the frame of the trailer and out the small holes provided in the frame proved to be easier said than done. On top of that, I wasn't content to use the crimp connectors provided with the kit. Instead, I soldered the connections for the running and tail lights, with the idea that they will last a little bit longer. We'll see. Total hours 67.75.